Showing posts with label DIY. Show all posts

March 4, 2014

Office Update

Well it's been about two months since Mike and I ripped out the closet in our spare bedroom in favor of putting in an office and I must say it's one of the best decisions we've ever made! For the first four months in our townhome, the spare bedroom was nothing more than a storage room where we could dump all the stuff we didn't feel like dealing with at the moment and close the door.

Now it's a place where we spend time every evening. Though after living with it for a while, we have made a few updates:

//1.Hide Those Cords! I strategically hid them behind the chair in the original shot but really it was a mess under the table. Mike mentioned that he's like to build something to hold them out of sight and away from our feet so last weekend I let him go at it.


//2.  Add Another Chair. Originally I had built this space for myself but only a few days later I found Mike and I were fighting over who gets the chair vs. the ground. Since chairs are a hot commodity around here (meaning we have none), we decided to 'splurge' and by a set. The space already had enough to keep the eyes busy so we went with these acrylic, 'tobias' chairs from Ikea. It's so nice for both of us to be able to comfortably work side-by-side in the evenings.


//3. Add a Rug. For some reason, the wood line from where the sliders used to sit really bothered me so when CB2 was having a rug sale last week, I went for it and bought this 'pembetatu' cotton runner I've been eyeing. I like that it's basically neutral with pops of color & plan on using it downstairs once we rip out all the carpet and replace it with hardwood next year.


Goose has also claimed this as his room (no, not in that way...although he does love to mark every tree/fire hydrant/pole in the neighborhood). He has a handful of toys/bones and has to keep them all in here. Everyday when I clean up, I put all his toys in his bed in our bedroom and about 10 minutes later they are all back in here. He's also learned how to open his plush toys and pull little tufts of fluff out which means it often looks like a stuffed animal massacre in there but he's having so much fun we don't mind cleaning it up.

February 7, 2014

Friday Favorites


Mike's birthday is Monday so this weekend is full of friends and fun (and rain)! Also, my wedding dress is finally in so I get to try it on for the first time on Sunday. I have a feeling this bagel will be the last one I eat for the next five months...

READ: Feeling lost and a need for self discovery was an overwhelming theme for me in January so when I stumbled on this interview on Design*Sponge, it really resonated.

MAKE: This healthy peanut butter dip. I haven't tried it yet but if it can satisfy my pb cravings without all the calories, I'm in.

ORGANIZE: I'm a huge believer in making lists to get things done. This online tool & app is a straight-forward approach to organizing your to-do's. I especially love its sharing capabilities which comes in handy when planning a wedding.

TRY: This spray-on sanitizing spray is all natural, convenient, and smells great! Our good friend actually works for this company and I recently re-discovered the sample she gave me -- just in time for flu season.

DIY: Don't forget Valentine's day is this Friday. With a shoe-string budget, I was searching for a few cute projects to do this weekend. This watercolor and gold-leaf geometric heart is on my list of things to make.

Image: Ali Harper

February 5, 2014

Currently Obsessed: Black Window Trim


//one//

There is a house on our street that they've been building since Mike and I moved in six months ago and I cannot get over how beautiful the windows are. The black, steel frames look amazing with the modern/Mediterranean architecture. They just put up a for sale sign and I am definitely going to drag Mike in there the first open house they have.

In our home we are *blessed* with old single-paned aluminum frame windows. Not only can you feel the draft from them, but they leave our entire complex looking shabby. I don't love the look of bright white vinyl windows, but I would take those over our current ones any day.


//two//three//

Mike and I have our first HOA meeting next week and we are totally nerding out over it. The president sent out a preliminary list of what is on the agenda and it includes everything that Mike and I have been wanting to address: rotten trim, over-zealous sprinkler system, hideous sign out front, etc. New windows weren't a part of it, but I'm hoping they can at least answer if replacing the old windows falls under the HOA or if it is our individual responsibility.

In the mean time, I am seriously considering painting the inside trim of our windows black. I am a little concerned about the paint chipping off when we open and close the windows but I read if you use oil-based primer, then they should hold up fine. I usually shy away from anything oil based because it's really hard to work with / clean up / is super toxic, but I might just have to give it a try for this project. Mike is heading to Asia on a business trip this month and I think it would be the perfect time to give it a go on at least one window.


//four//

December 16, 2013

Out of the Closet

I'm about a week late on this project but this time I'm blaming it on the weather and Mike being frugal with the heater (a quality I both love and loathe at the same time). Apparently it has to be above 50 F to paint so I waited until this weekend when it warmed up a bit. 

I'm so happy with the way the office nook turned out. I see a lot more CPA studying in my future now that I have a cozy place to focus.


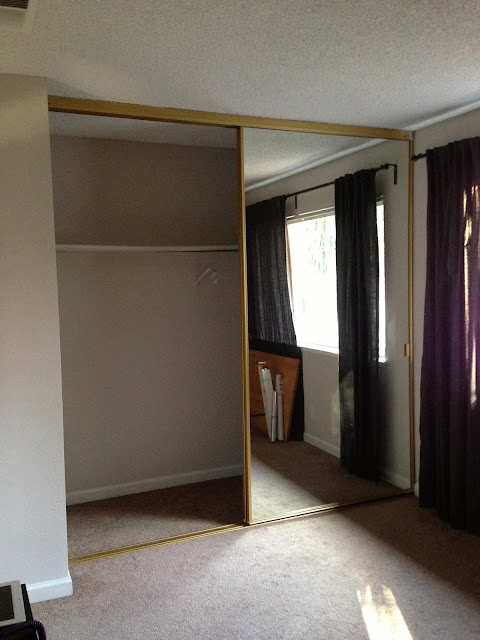
The large mirror doors were relatively easy to remove (and if anyone can use them, let me know). After that it was just a matter of patching and painting the area where I pried off the wooden supports. Unfortunately, none of the six paint cans that were left by the previous owners matched the beige walls so I had to go on a hunt for the right color. Luckily the paint in the bathroom is the same as the rest of the house so I was able to get a code for the Kelly Moore color off that can even though the bathroom paint was a semi-gloss and I needed flat.

As usual, I did all the detailed work and Mike came in at the end with the roller. I guess if you measured in terms of surface area, Mike did the most painting but since he didn't use a tiny paint brush to make sure there was an even line where the chalkboard paint met the ceiling, I'm keeping the award.

Other than that, everything here is stuff we already had which makes this project a total of $25 for two quarts of paint. The only other thing this area needs is a rug to hide where the bottom rail of the closet used to be which will be a temporary fix until we rip out the carpet upstairs and replace it with hard wood in a couple of years.


December 6, 2013

Office Space

Not this one...


But what used to be this one:


As you can see, I got oh so excited and forgot to take a proper 'before' picture and have already started to rip out the shelf and hanging bar. But who needs a spare closet when you have plenty of storage space and there are office nooks to be made!


Check back early next week for the big reveal. For now I will leave you with this beautiful & blurry progress shot... 

Anyone else got big plans for this weekend? 


December 4, 2013

Fixing the Leaky Sprinkler System

Mike and I are learning a lot of new things with this house with this past weekend being our first adventure in irrigation. Neither of us are experts and agree for the big stuff we will call in the professionals, but for this minor fix we decided to DIY.

I noticed a few weeks ago that the ground around the irrigation valve was wet so I put a bucket under it to determine how badly it was leaking. Nothing annoys Mike more than wasting water or energy so this project shot to the top of the list once we determined that the leak was significant.

The long side of our house is most exposed to the elements so it didn't surprise me that this valve was the first to go. Here is what we started with:


Not knowing what we really needed, we headed down to the HD to figure it out and were pretty much amazed at the entire isle devoted to irrigation systems.

We weren't sure exactly what we needed so we picked up some spare parts and extra PVC since they were all pretty cheap. The most important thing is to know what size PVC your irrigation system uses since everything you buy will depend on that. The most common seems to be 1" or 3/4" and ours was the latter.

After we got everything home, Mike turned off the water, cut away the old system, and began to 'dry fit' the new one. It's important to figure out how everything fits together before applying the glue because once that's on, it's permanent.


1) Christy's Red Hot Blue Glue (no primer needed for this stuff)
2) Anti-Siphon Valve
3) Female Adapters (we had already connected them to the valve - don't forget the teflon tape!)
4) Extra 3/4" PVC
5) Slip Elbows
6) Couplers
7) Ratcheting PVC Cutters

After gluing it all together and turning the water back on, we are happy to announce that it is still an eyesore leak free. We still have to get a new timer and wire that up but it's coming along. We are planning on building raised beds in the spring for our little vegetable garden and it will be so nice to be able to hook everything up to a drip system.


December 2, 2013

IKEA Art Makeunder


Speaking of my dysfunctional relationship with art, I have a bad habit of trying to buy art for a specific space instead of just buying what I like and then finding a way to incorporate it.

Exhibit A (below) is a large print from Ikea that I bought a few years ago while trying to fill blank wall space in the house I lived in at the time. The size and price was right and even though I wasn't crazy about the actual print, it didn't look terrible with the colors and furniture of my first place.

Fast forward a few years and its permanent spot has been leaning against a wall, tucked away in some corner. I though about selling it on CL but framed canvases are worth more than the $10 I would get for it so I decided to test my artistic side and cover it with something I liked. I don't usually advocate painting over art, but mass-printed pieces are the exception for me.

Knowing my artistic limits but also wanting to add some color to this wall in our dining nook, I settled on a mint green ombre effect. The old painting had texture to it which I thought would give it just enough visual interest without being overwhelming like the original print.

I started by taping off the black frame with painter's tape and using a spray primer to cover the old print since I didn't want any of the original colors popping through.


Next, I headed to my favorite store to pick up a few test pots of the perfect minty green. I got a sample of all three colors on the same test strip but looking back, I could have probably gotten away with just getting the lightest and darkest color and then mixing them as I went.


Originally my plan was to paint the lightest color first, let that dry, and move on to the darker colors -- but to get the look I wanted, I figured out it worked better if the two colors were still wet and I used a clean brush to blend them together.

I started this project a while back but finally got around to finishing and hanging it yesterday which then followed with this conversation:

Me: do you like my art?
Mike: oh... it's done?
Me: my artistic abilities are kinda limited... should I add something else?
Mike: how about a bike?

Forget birds. Around this house, 'add a bike to it' is the new mantra. Needless to say, that idea got vetoed. I like the simplicity of it for now and who knows, it might just get a bike added to it in the near future.


November 18, 2013

Kitchen Before & After

Mike and I actually finished the kitchen a few weeks ago but I hadn't gotten around to taking a few 'after' photos until this weekend. I love the way the dark paint adds contrast to the cabinets and brings the whole kitchen out of the 80's. The new hardware (both internal rollers/guides & external hinges and pulls) is the icing on the cake for us. Not only do the elongated pulls look more in-proportion to the cabinets, but now our drawers don't fly out whenever we need a fork!


Isn't it amazing what paint can do?

November 12, 2013

Tufted Headboard for Under $200

While the cat's away, the mice will play redecorate. This past weekend was amazingly productive with three days of nothing planned. I honestly can't remember the last time that happened but it was just what I needed to re-discover my creative side. I mainly focused my efforts on our master bedroom and bathroom with a few other projects thrown in there and am quite happy with the results.

The biggest item on my 'to-do' list was recovering our headboard. I bought this large canvas while living in the apartment but was never happy with my first upholstery job. The 'before' fabric was our previous duvet cover and while I loved the pattern, the stretchy fabric and design didn't lend itself well to this use. You can see in the picture below how the pattern wasn't straight and it looked saggy.


If you have a queen, you will want to get a 36" x 72" pre-stretched canvas. These can get really expensive but I found one at my local art store on sale for about $110. I've seen tutorials where people just used a large wooden frame but the actual canvas was a must if you are going to tuft it since you will need a backing for the buttons to hold on to. The other option is to get a piece of plywood cut to this length but I wanted something light that I wouldn't have to anchor into the wall (especially something to consider if you are renting).

I originally went with one layer of batting but decided to add an extra layer to make it softer and let the buttons stand out more. For a queen size you will need about two and a half yards for each layer which will run you around $3 a yard. For the fabric, look for something sturdy that can stand up to being stretched and stapled. Being cost conscious, I went for the sale section and found this lovely blue linen for $4.99 a yard and bought three yards so I'd have extra to make the buttons.


From there you want to staple each layer at a time to the back of the frame with staples about 3" apart making sure you are pulling the fabric tight all the way around. Once the frame was covered, I leaned it against the wall and broke out my large level to mark where I wanted my buttons to go. I decided on a grid pattern so I marked a dot every foot after I had measured 6" in from the edge.


For the button detail, I liked the look of the same fabric so I bought a kit at the fabric store to make my own. This was probably the most tedious part of the whole process but worth it in the end for the look I was going for. The directions on the back are pretty self explanatory but I definitely recommend getting the set with the little tools to make forming the fabric around the shell easier.


Once the buttons were made, I went to town with some needle and thread making sure I pulled the buttons as tight as I could before tying them off on the back side (this is where having the thick canvas as the base really came in handy). I used a basic cotton thread and looped it four times to make it really strong.

Originally I was contemplating using a patterned or brighter fabric but I love the how the blue is subtle next to our white duvet, dark wood, and grey accents.